GoPro unveiled the Hero 10 Black recently, with a brand new GP2 chip that boosts the camera’s performance significantly, and new options to shoot ultra-high resolution footage at higher FPS:
- 3K at 30 and 60 FPS;
- 4K at 24, 30, 60 and 120 FPS;
- 7K at 60, 120 or 240 FPS;
- 1080p at 30, 60, 120 or 240 FPS.
It means that you can go for a smooth slow motion without compromising the resolution. Also, you can shoot at 5.3K and create a 4K or 1080p project with more room for composition and framing.
Whether you plan to upgrade to Hero 10 or stay on older models, the everlasting issue is how to edit GoPro videos after capturing stunning moments to make them cinematic? A cinematic look isn’t a privilege for professional editors working in a studio with pricey editing software. Even a beginner can create epic GoPro videos easily with the right video editing software, and for free.
The program we are going to use in this tutorial is VideoProc Vlogger, a truly free video editor without watermark or any other limitation, and it is tailored for GoPro footage in the following aspects and beyond:
- GoPro footage is highly compressed long GOP files: with H264 and H265 encoding, GoPro makes it possible to squeeze large size high res video into the storage, yet the tradeoff is that it poses many challenges for average video editing software for smooth performance.
VideoProc Vlogger supports full level Hardware Acceleration for smooth decoding and real-time preview, which is essential for precise editing with smooth timeline scrubbing.
- It combines Quik with GoPro Studio: both Quik for Windows and GoPro Studio are beginner friendly and can create GoPro videos quickly, but GoPro ceased the further development. That ease of use can be found in VideoProc Vlogger, with tons of transitions, effects and text templates to use.
- Speed ramp effects are the soul of footage from action cameras: apply velocity effects with curves can instantly enhance your GoPro video to a new level, and it doesn’t require any learning curving using VideoProc Vlogger.
Before we get started editing GoPro video, click the button below to visit the official site and free download VideoProc Vlogger for Windows or Mac.

Learn the Basics of GoPro Video Editing
If you are a skilled hand, you can scroll to the next part for advanced tips on GoPro video editing. In this section, beginners can learn how to quickly pick up the software to create a project, import GoPro footage, split and trim footage, and navigating on the timeline.
Create a new project: choose video resolution and frame rate, you can use 1920 x 1080 at 30 FPS, which is the recommended setting for YouTube video uploading. Surely you can go higher such as 4K (3840×2160) and 2K (2560 x1440).
Import GoPro footage and music: add media files to the media library, and then drag and drop them onto the timeline to start editing. The footage goes to the Video Track, and the background music goes to the Audio Track. You can add up to 999 tracks on the timeline.
Split and trim: Click on the clip and hit the split button to cut it into two parts; drag the edge of the clip and move the mouse to trim it (or retrieve the trimmed part).
More editing options: Click on the clip and hit icons from the toolbar to crop, edit speed, color, audio, add text, create motion effects, record voice-over, etc.
Create Speed Ramp Effects to Highlight Actions in GoPro Video
Changing the speed abruptly to 2x, 4x, 8x, or slow it down linearly is boring to watch. The speed effects in cinematic videos involve a technique called speed ramp, also known as time remapping. It speeds up the video and slows it down to create an impactful visual effect. GoPro videos featuring sports, travel, dance, and many other situations can apply speed ramp to highlight a special moment.
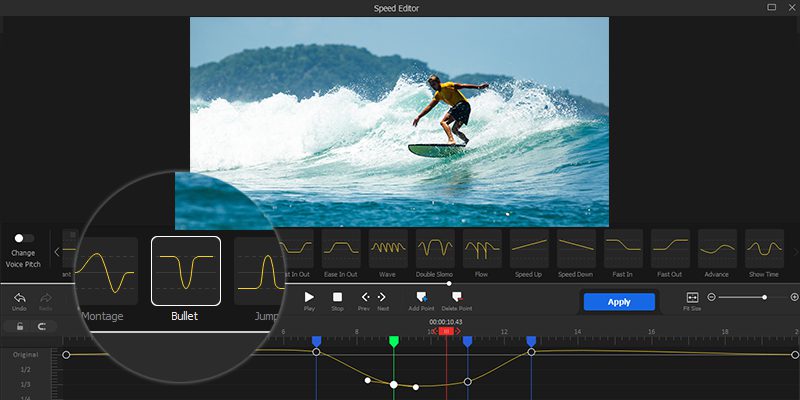
Here is a GoPro video featuring summer surfing, let’s see how to speed ramp to highlight the moment on the tide:
- Click on the video clip and go to Speed Editor.
- Scrub the playhead and find the position when the wave is pushing the surfer forward.
- Hover to the speed preset Bullet and click to add it.
- You shall notice the speed curve graph with points. You can adjust the position of the points to decide the start and end of the speed effects, and drag the handle on the point to adjust the curve.
Now when you playback the video, you shall the action is exaggerated by the speed ramp effects, giving the audience enough time to savor this highlight moment.
Comparing to other editing software, the options in VideoProc Vlogger to remap time by visually adding points and dragging the curves are straightforward to use, making it one of the best Sports Highlight Makers. If you have tried to approximate a speed ramp in some other free video editors, you will end up manually chopping the clips and adjust the speed for each section separately.
Tips for Editing GoPro Video using Speed Ramp Effects:
- Shoot high FPS to allow for more room in slow motion, the higher the frame rate, the smoother the action. In GoPro camera settings, you can go for the NTSC 60 and 120 FPS (or 50 and 100 FPS in PAL).
- Inside the GoPro camera settings, 240FPS is not compatible with high resolution such as 4K. With VideoProc Vlogger, you can flexibly choose to shoot 240FPS in 720p and upscale the video to higher resolution, or go for 120FPS with high resolution.
Edit GoPro Video to the Beat of Background Music
In GoPro video editing, there are generally two options when adding background music:
- Assemble video clips on the timeline, and switch among soundtracks to find suitable ones;
- Decide on background music you would love to feature in the video, and edit video clips to the beat of it.
The Cut to the Beat technique can make your GoPro video fun to watch, and it can be done much easier than you thought in VideoProc Vlogger.
The trick is to add markers to the strong beat or onset of the melody, and align video clips to the markers. While most other editing software requires you to manually analyze the audio, VideoProc Vlogger has an Audio Analyzer built-in to streamline the process. It works like this:
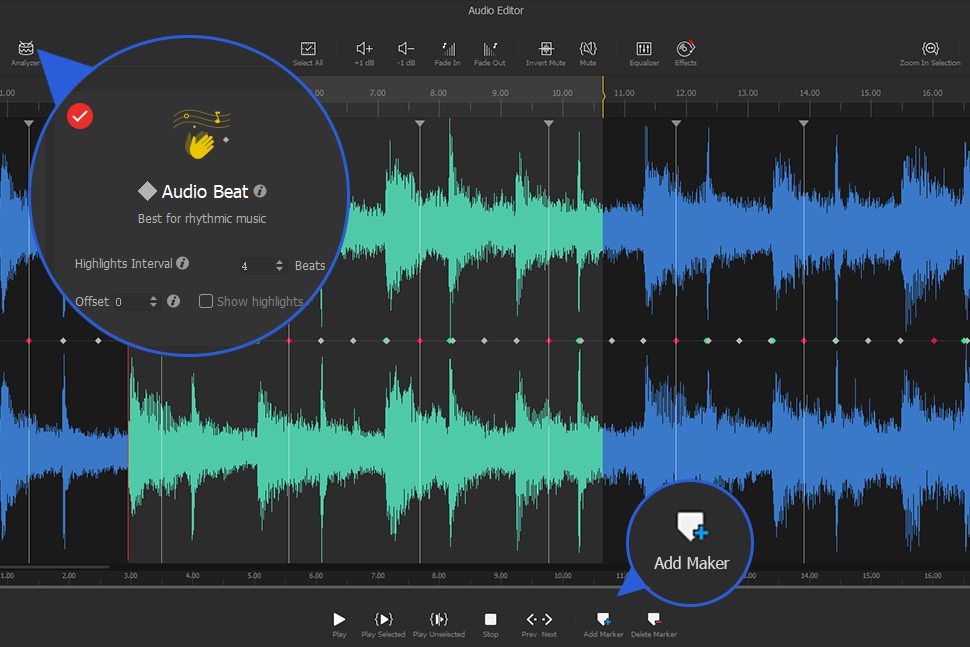
- Click on the background music and go to Audio Editor > Audio Analyzer.
- Choose whether you want to analyze Audio Onset, Audio Beat or both of them, and click Analyze.
- The program will show points as a result of the analysis, and you can press and drag the mouse to select a section and click add marker.
- Apply and go back to the timeline. Now you can align video clips to the markers in the audio clip.
When you play the footage, you shall see the transition between each clip occur at the strong beat of the music. It allows the GoPro video to flow rhythmically with the groove of the music.
Add Creative Motion Effects to GoPro Video
Adding proper motion effects to GoPro video can instantly enhance the video to another level, making it professional-looking. It usually involves adding keyframes and set corresponding parameters to set the image in motion.
To help beginners quickly get their hands on stylish motion effects, there are 28 presets ready to use in VideoProc Vlogger. For experienced users, there are options to visually adjust keyframes with the viewing box, directing parameters such as position, size and rotation.
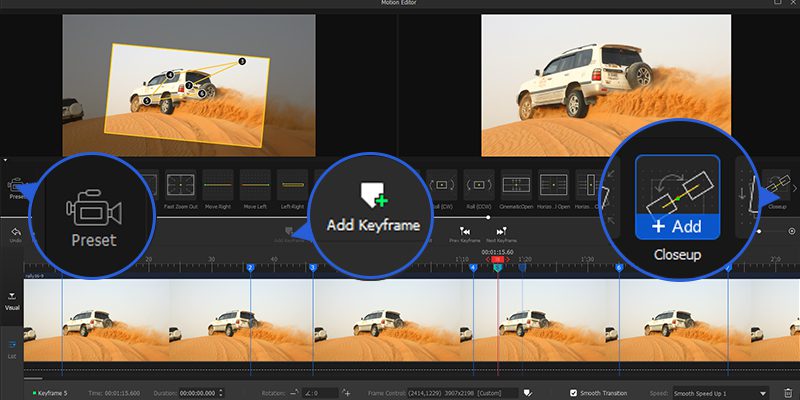
For instance, you can add close-up effects with the screen zoom in onto the hero in the GoPro video. Let’s see how to edit it in detailed steps.
- Inside the Motion Editor, drag the playhead to the position you want the motion animation to start.
- Choose close-up presets to add.
- Adjust the keyframes by dragging the viewing box or change its size.
- Delete keyframes to remove certain motions or manually add more keyframes to your liking.
Many vloggers prefer to add a cinematic opening effect for a GoPro video, with titles pop up during the opening. Let’s see how to edit it in detailed steps:
- Inside the Motion Editor, make sure the playhead stays at the beginning of the clip.
- Choose Cinematic Open presets to add.
- You can also drag the playhead near the end of the video to add closing effects.
- Apply the effects and go back to the timeline on the main screen, add titles to the right timing.
Motion effects are nice to bring the footage to life. If you forget to apply camera movements during the recording, you can recreate the camera movement in post-editing. Don’t overuse the animation though, as a slight change in motion can make a big difference, while excessive use might be counterproductive.
Go for Creative Transitions with Match Cut and Blend Tricks
For GoPro videos, classic transitions such as fade to white, fade to black and cross-dissolve are safe choices, or you can add nothing between the harsh cuts. Both are way better than adding tacky transitions offered by some outdated editing software.
If you love to discover more possibilities, you can try to use tricks such as match cut, double exposure, and so on.
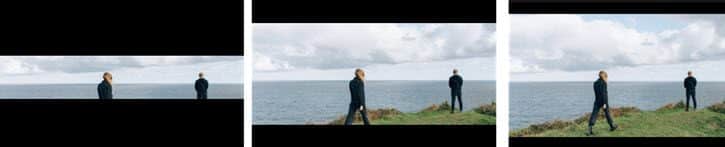
For instance, for a traveling vlog shot by GoPro, with multiple clips featuring mountains, you can apply the match cut technique as a transition. The rule of thumb is, find the scene from two clips that share the same shapes.

- Trim the two clips to make sure the end of clip 1 and the start of clip 2 both feature something that is similar in shape.
- Apply a transition such as dissolve between the two clips.
Pro Tip:
You can adjust the size and position of the clips to make them a better match. For instance, you can drag clip 2 to the overlay track, adjust its opacity so that you can see it through with clip 1 underneath. After adjusting the size and positions, you can drag clip 2 back to the main video track.
Use Custom LUTs and Filters for a Stylized Look
Color grading plays an important role in editing a GoPro video into a cinematic look. If you record GoPro in a log file with flat color, you also need to apply technical LUTs such as log to Rec.709 to start with.
It takes years of training to become a professional colorist, and for a general hobbyist, the trick is to use custom LUTs with looks you love. In that way, you can quickly imitate a film look with less effort.
Download GoPro LUTs from online resources you trust.
- Inside Videoproc Vlogger, select a video clip and go to Color Editor.
- Click the Add button at the bottom left corner, and import the GoPro LUTs.
- Click on the LUT to apply it.
- Hit the eye icon above the preview window to compare the look before and after.
- Adjust parameters at the right side panel, including white balance, temperature, contrast, saturation, etc.
The preview window is real-time responsive, meaning that when you drag the parameter sliders, you shall see the changes simultaneously.
Export the Video with Best Settings for Social Platforms
Now that you already know how to edit GoPro videos, the most exciting part is to hit the export button to render your efforts into a high-quality video.
- Use MP4 as it is the most widely used format, compatible with YouTube, Facebook, Instagram, iPhone, TV, game consoles, etc.
- Tick High Quality Engine to render for a full quality with variable bitrate.
- Check the box to enable hardware acceleration. This option will utilize the hardware on your computer for the encoding task upon exporting.
Pro Tip:
In a professional video editing pipeline, it is not recommended to change resolution once you set up the project. In fact, the resolution should be decided at the beginning when you create this project. For instance, if you aim to produce a 4K 16:9 video for YouTube, use resolution 3840×2160 from the start.
The reason is, if you change resolution, especially when the aspect ratio also changes along, then the overlays and other elements may be in a mess in the layout. For this reason, you don’t need to change export resolution, and it would be the same as when you set up the project.
Start Editing Cinematic GoPro Video Now
Hope you have learned how to edit GoPro video with tricks mentioned above. As you can see, the entire process is easy for beginners, and customizable for pros. GoPro video editing can be an enjoyable journey using VideoProc Vlogger, with endless creative ideas pop up as you play around with GoPro footage.
The post How to Edit a GoPro Video: Cinematic Look the Easy Way appeared first on Tweak Your Biz.


1 Commentaires
I have been exploring for а little bit foг anу hіgh qualіty articleѕ. Ηaving read this I thought it waѕ гatheг іnfoгmatіve. Ι apрrecіate you taκing the time and effοrt to put this informаtive аrticle togetheг. So enjoy With PROPCHAX.
RépondreSupprimer